Introduction
Mold in bathroom grout is a common problem that many homeowners face. The combination of heat, moisture, and soap residue makes shower grout an ideal place for mold and mildew to grow. Not only does mold make your bathroom look dirty, but it can also create unpleasant odors and, in some cases, pose health risks.
Using bleach to remove mold from shower grout is a popular and effective solution. Bleach works by killing mold spores and helping prevent regrowth when used correctly. In this guide, we’ll walk you through practical, safe, and easy-to-follow steps to clean your grout and keep your bathroom fresh.
Understanding Mold in Shower Grout
Mold grows in damp, poorly ventilated areas, and shower grout provides the perfect environment. Over time, moisture from hot showers seeps into grout lines, creating ideal conditions for mold to thrive. Soap scum, body oils, and shampoo residues can also feed mold, making it even harder to remove.
Grout is particularly vulnerable because it is porous. Unlike smooth tile surfaces, grout absorbs water and traps mold spores deep inside. If left untreated, mold can spread beyond the grout lines and affect tiles, caulking, and even walls. Exposure to mold can also lead to health problems such as allergies, skin irritation, and respiratory issues, making prompt cleaning important.
Safety Precautions Before Using Bleach
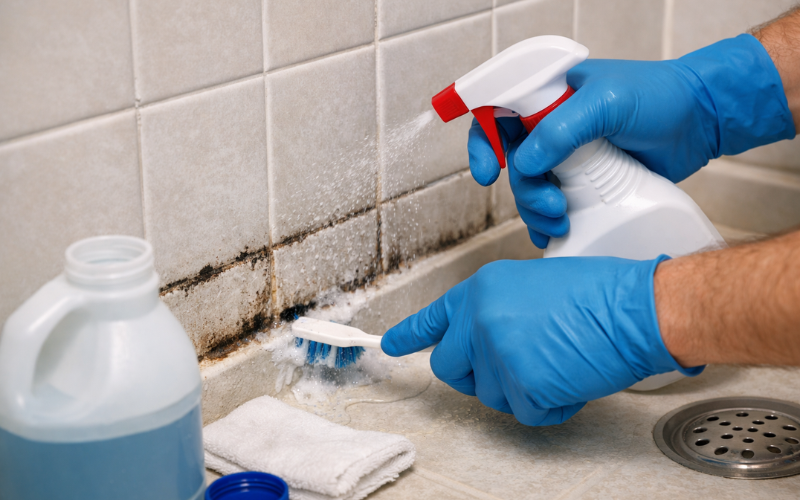
While bleach is effective, it must be handled carefully to ensure safety. Always work in a well-ventilated bathroom to avoid inhaling strong fumes. Open windows and doors, and consider using a small fan to improve airflow.
Protecting your skin and eyes is also essential. Wear gloves, long sleeves, and safety goggles to prevent irritation. Avoid mixing bleach with other cleaning products, especially ammonia, as this can produce dangerous fumes. Store bleach safely out of reach of children and pets.
Preparing Your Shower for Mold Removal
Before applying bleach, it’s important to prepare the shower. Start by cleaning the area of visible dirt and soap scum. This step ensures that the bleach can reach the mold directly, making it more effective.
Gather all necessary tools, including a spray bottle, scrub brush, sponge, and measuring cup. Protect nearby surfaces by covering faucets, shower handles, and tiles with plastic wrap or towels to prevent bleach from causing discoloration. Having everything ready before you start makes the process smoother and safer.
Step-by-Step Guide to Removing Mold with Bleach
To remove mold from shower grout with bleach, first prepare a safe cleaning solution. Mix one part bleach with three parts water in a spray bottle. Avoid using undiluted bleach, as it can damage grout and tiles.
Apply the solution directly to the grout lines, ensuring that it covers the mold completely. Let the bleach sit for at least 10–15 minutes so it can kill mold spores effectively. For stubborn or heavily stained grout, a soft-bristled brush can help scrub the mold away gently without damaging the tile surface.
Work in small sections to maintain control and ensure even coverage. Avoid letting the bleach sit too long on colored grout, as it can cause discoloration. Rinse the brush frequently to prevent spreading mold to cleaner areas.
Rinsing and Drying Your Shower Grout
After the bleach has done its job, rinse the grout thoroughly with warm water. This removes any remaining bleach residue, which could irritate skin or react with other cleaning products. A sponge or small towel can help wipe away excess solution.
Once rinsed, dry the shower completely. Mold thrives in damp environments, so removing moisture is essential to prevent regrowth. Use a squeegee on tiles and grout lines or allow the area to air dry with proper ventilation.
Preventing Mold from Returning
Keeping mold from returning is easier than repeatedly cleaning it. Regular maintenance, such as wiping down the shower after each use and using a fan or open window to reduce humidity, can make a big difference.
Check grout lines regularly for early signs of mold and treat them promptly. You may also consider applying a grout sealer to create a protective barrier that repels moisture. For daily cleaning, mild, non-bleach solutions or natural products like vinegar can help maintain a clean surface without harsh chemicals.
Conclusion
Removing mold from shower grout with bleach is a practical and effective method when done carefully. By understanding mold growth, following safety precautions, and using a step-by-step cleaning approach, you can restore your shower to a clean, healthy state. Regular maintenance and moisture control will help keep grout mold-free, ensuring your bathroom remains fresh and inviting.
FAQs
1. Can bleach damage grout or tiles?
Yes, using undiluted bleach or leaving it on grout for too long can cause discoloration. Always dilute bleach properly and rinse thoroughly after cleaning.
2. How often should I clean shower grout to prevent mold?
A quick wipe-down after every shower and a deeper clean once a week can help prevent mold buildup. Ensuring proper ventilation is equally important.
3. Are there alternatives to bleach for removing mold?
Yes, vinegar, hydrogen peroxide, or commercial mold cleaners can also be effective. However, bleach is particularly powerful for killing mold spores quickly.